Monday, September 17, 2007

Beef Bourguignon

Photo Sharing and Video Hosting at Photobucket

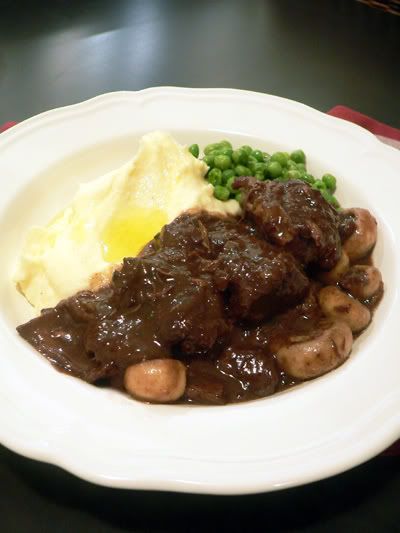
Cooking French food is always lots of fun, especially when you're cooking for a real French person. This Friday, I hosted a little dinner for a few friends, one of which who's French through and through (I also suppose she'd kill me if I did injustice to her national cuisine!). Rather than going all out to do something new, I trusted my better judgement and went with an old favourite of mine that I keep handy in my arsenal for ocassions like this: la boeuf bourguignon!

I've cooked this dish many times before, both at home and at work, and it's one of those dishes that guarantee a high probability of success. I mean seriously, who doesn't have a soft spot in their heart for rich, meaty, fork-tender, slow braised beef?

For the best possible beef bourguignon that you can make, here are some tricks of the trade that I'd be happy to divulge:

1) This dish has its origins in Burgundy, France. Most of the red wine produced in Burgundy is of the Pinot Noir variety, so a deep, full-bodied Pinot Noir would be ideal for use in this dish. If you can't get hold of a rich Pinot Noir (which is highly unlikely considering the wine glut in Australia), you could possibly get by with a Merlot.

2) Choose the beef carefully. I, personally, am not a fan of the usual chuck steak or topside for stews and braises. I feel that they tend to be a tad dry and fibourous even after being cooked to a tender state. When eating a slow-cooked red meat dish, I often look for gelatinous and soft membrane-y bits that add variety to the mouthfeel of the dish. It is for this reason that I love to use the more modest cuts such as cheeks, ribs, shins, briskets and tails, which contain heaps of tough stuff that can be cooked down to gooey-goodness. On this ocassion, I used a mixture of the the first three. (You'd be surprised to learn that the lesser known beef cheeks can actually be found in many larger Woolworths supermarkets, next to where they display the offal. Beef shin is also known as gravy beef, and is commonly found in most supermarkets.)

3) "Depouiller, depouiller, depouiller." That's what a French chef once taught me as the secret to making a great beef bourguignon. Literally translated, it means: "skim, skim, skim", and it refers to the time consuming task of continuously removing the fat and impurities that rise to the top of the sauce as the meat cooks. Lesson 101 on fat and impurities: if you don't skim them off quick enough, they fall back into the sauce to make it cloudy and grainy, a.k.a. - RUINED. A good beef bourguignon should have a sauce that's deep and rich, but still clear and glossy. If necessary, the meat should be removed and the sauce strained several times before serving. As you can see, the French people take a lot of pride in making their dishes perfect, so I think we should too.

You can find a good recipe for beef bourguignon at wikipedia. But if you just apply these three pointers that I have just made in addition to that, I assure you that everyone will be blown away. Yes, even a real French person.

Saturday, August 04, 2007

Chouquette, New Farm

Photo Sharing and Video Hosting at Photobucket
Coffee Eclair, Paris Brest, Cherry Macaroon (yum!) and Chocolate Macaroon


Hidden away from the heavy traffic of Brunswick Street, somewhere in the heart of New Farm, lies this little gem of a patisserie. Chouquette (pronounced shoo-ket) is named after a darling little French pastry made simply with choux pastry (the good stuff used in eclairs) and coarse sugar crystals. Don't get me wrong when I say this, the chouquettes there are lovely ($2 for a bag of 10 bite sized morsels), but what I'm here to rave about are actually the macaroons! The finest yet that we've come across, especially the cherry one, which boasts generous chuncks of fruit laced through the ganache filling.

Photo Sharing and Video Hosting at Photobucket
Chouquettes


Among the other goodies that we sampled were a coffee eclair, a Paris Brest (a donut shaped ring of choux pastry split open and filled with cream, then topped with toasted almonds and icing sugar), and a chocolate macaroon. Just a little trivia about the Paris Brest, and how its name came about: a French pastry chef I once studied under explained to me that the these pastries were first created by a patissier whose patisserie lay along the route of the famous bike race from Paris to Brest, back in the day. In honour of the atheletes, he made these pastries in the shape of a bike wheel. People loved them and they've been around ever since!

Chouquette also specialises in breads and speciality cakes, and the next time we go back, I know I'm definitely gonna get my hands on one of those great looking, rustic baguettes.

Chouquette
19 Barker Street
New Farm, Brisbane, QLD
07 3358 6336
Closed on Mondays

Monday, July 16, 2007

Thai Deep Fried Egg Salad - Yum Kai Dow

I first had this dish at a picnic cum potluck a few years back, where a Thai friend of mine, Noi, proudly presented this dish to the crowd. I was shocked at how delicious this dish was, considering the few very simple ingredients and steps involved in its preparation. Unfortunately I never got around to asking her for the recipe.

Just last week, we had invited another Thai friend of ours, Pang, over for dinner. This time, I was madly craving for Yum Kai Dao and decided that I HAD to make her show me how to prepare it. I've eaten Pang's Thai cooking before, and I can seriously vouch for its goodness; I guess I could rely on her to recreate Yum Kai Dao for me. So she did. And it was lip smacking!

Photo Sharing and Video Hosting at Photobucket

Yum Kai Dao - Deep Fried Egg Salad

4 large eggs
1 brown/white onion, thinly sliced
2 tomatoes, wedged
a bunch of lettuce/salad greens
a bunch of coriander

Dressing:
1 tsp finely grated raw garlic
4 tbsps fish sauce
4 tbsps fresh lime juice
4 tbsps palm sugar
chopped fresh chilli, quantity as desired

Crack eggs into very, very hot oil and deep fry till fluffy and crispy, and yolks are cooked through. The hotter the oil, the fluffier and crispier your eggs will be. Let cool slightly, then cut into rough chunks and toss with vegetables. Combine salad dressing ingredients in a bowl and further adjust the taste as necessary to suit your liking (I like mine quite sour and hot, so I tend to give a few more bits of lime and chilli). Dress the salad and tuck in!

Friday, July 13, 2007

The Inside of a Meat Pie from Absynthe Bakery

Photo Sharing and Video Hosting at Photobucket

Hi folks, just to further expound on one of my previous posts regarding meat pies, I made a special journey down to Circle on Cavill, Surfers Paradise just to test out the acclaimed meat pies at Absynthe Bakery. There were only 2 types of pies left by the time I arrived, a beef and red wine pie, and a lamb and mushroom version. I got to sample both, and they were fantastic. Just to prove my point, I took a picture of the inside of the lamb pie, showing the sheer amount of filling that they pack into their pie pastries. I know it's a bit of a nasty shot, the pie being chewed up and all, but just look at the quantity of meat in that baby! For pies of that size and meat density, they certaintly make for a full meal all on their own. And boy, was I stuffed!

Wednesday, July 11, 2007

Baked Italian Sausages, Beans and Eggs

Photo Sharing and Video Hosting at Photobucket

Here's another dish to warm up your chilly winter. Preparing and cooking the beans takes a bit of time, if you are using dried beans that is. However, if you don't mind the idea of using canned beans, please be my guest; it will save you heaps of time to be frank. But for the sake of those purists out there, I will talk you through the steps right from the top, using dried beans to begin with.

Beans in Tomato Sauce with Italian Sausages and Eggs

300 gms dried borlotti/cannellini beans, soaked overnight in water
2 litres water
half an onion
half a tomato
2 bay leaves

1 onion, chopped
3 cloves of garlic, chopped
1 anchovy fillet (optional)
pinch of dried chilli (optional)
1 stalk of rosemary
3 stalks of thyme
1 litre of passata, or equal volume of tinned tomatoes

6-8 Italian pork sausages
a few eggs
extra virgin olive oil
crusty bread, to serve

Drain the beans from their soaking water. Add them to a pot with all remaining ingredients and simmer for half an hour to 45 minutes, or until beans are just tender, and not mushy. It is crucial to add the tomato half as it helps to soften the skins of the beans. Also, do not salt the beans at this point as salt causes their skins to toughen. Once done, drain and set aside. (If using tinned beans, simply omit this step and begin from below:)

In a saucepan, sweat onions, garlic, anchovy and chilli with a good amount of olive oil. Once translucent and fragrant, add in the entire bunches of herbs together with the passata/tinned tomatoes. Return beans to the pan and simmer for 15 minutes. Season to taste.

Place bean mixture in a baking dish. Randomly distribute over the sausages, pricking with a fork to prevent them from 'exploding'. Drizzle sausages with olive oil and place dish in a preheated 200 degree celcius oven. Bake for 15-20 minutes till sausages are nice and brown. Using a spoon, make a few wells in between the sausages and crack an egg into each well. Bake for a further 5 minutes till the eggs are just set. Serve bubbling at the table with crusty bread to mop up the beans and runny egg yolks. Lovely.

Buffalo Wings with Blue Cheese Coleslaw

Sorry guys, we know it's been a while since our last post. Bev and I have been pretty tied up with work and all for the last few weeks. Anyway, we're back again, and here is the first of a few backlogged entries to come.

Photo Sharing and Video Hosting at Photobucket

This is a recipe for buffalo wings from Bev's stack of recipe cuttings. I matched these wings with a recipe for blue cheese cloeslaw that I chanced upon at CHOW.com, one of my favourite foodie sites. And as funky as it sounds (blue cheese coleslaw), it actually makes perfect sense, seeing that buffalo wings are typically served with crunchy vegetables and a blue cheese sauce!

Just keep in mind, if you were to use the Italian Gorgonzola for the blue cheese, be sure to use Gorgonzola Picante (a sharp gorgonzola) instead of Gorgonzola Dolce (a milder, sweeter gorgonzola), as there will be huge variances in the results. Also, instead of undertaking the labour intensive task of shaving my own vegetables for the slaw, I simply popped open a bag of ready shaved coleslaw vegetables from the supermarket. Ah, the conveniences of modern day grocery shopping!

Photo Sharing and Video Hosting at Photobucket

Buffalo Wings

1/2 dozen chicken wings
2 tbsps melted butter
4 tbsps tabasco sauce
1 tbsp smoked paprika
1/2 tsps salt
1/2 tsps cayenne pepper
1/4 tsp cracked black pepper

Toss wings with all of the specified ingredients. Marinate for at least one hour. Grill in a hot oven, at 210 degrees celcius, for 10 minutes on each side, basting frequently with the left over marinade.

Blue Cheese Coleslaw

recipe at CHOW.com

Sunday, June 17, 2007

As Nice as Pie

In this month's issue of the Australian Gourmet Traveller, the Gourmet News section on page 16 is devoted to featuring the editor's picks for some of the best pies around the country. Of these, proud Queensland establishments Bespoke, Yatala Pies, Joycelyn's Provisions and Absynthe Bakery can celebrate the great honour of making the list.

In addition to that, and just to delve further into the topic of good pies, I would like to make an honourable mention of Songbirds in the Forest, which serves a killer rabbit, mushroom and herb pie. Their's is essentially a revamped version of everyones classic favourite, served atop a mound of smoothly pureed mushy peas, and drizzled with a rich madeira jus. Yes, I know this is a little of a longshot from the usual comforts of a messy, saucy meat pie with tomato sauce, but it sure makes up for every bit of that in the taste catagory alone.

Photo Sharing and Video Hosting at Photobucket
Rabbit, mushroom and herb pie from Songbirds, Mt Tamborine


Meat pies have been feeding the hungry man for ages, but sadly, aside from being an expert in devouring them, I know little else about their place in our society. Thus, I took it upon myself to research further into the literature of the humble (meat) pie.

Surprisingly, my research revealed a few neat facts:

- meat pies were described by former New South Wales Premier Bob Carr as Australia's "national dish"

- Australians consume an average of 12 meat pies each per year

- Four'N Twenty Pies produce 50,000 pies per hour

- by Aussie regulations, meat pies may legitamately contain snouts, ears, tongue roots, tendons and blood vessels (urgh!)

Personal research even led me to try Domino's meat pie pizza which, while Bev enjoyed, I was rather disappointed with (it's a pretty cool idea, but having shortcrust pastry on pizza dough is just a little too heavy on the starch for me).

On a lighter note, I discovered this awesome sounding thing called the pie floater, which is a meat pie topped with tomato sauce, and floating in a puddle of green pea soup (oooh!). Apparently it was popular all over the country at one point in time (how long ago was that?), but it's popularity gradually weaned and now its availability is limited to mostly only South Australia, where it was officially recognised as a South Australian Heritage Icon by the National Trust of Australia back in 2003!

Geez, now I really gotta sink my chops into one of those pretty soon! Maybe a little pilgrimage to Adelaide on the horizon? We'll see about that..

Photo Sharing and Video Hosting at Photobucket
An old picture of me mucking around, making a beef pie

Saturday, June 16, 2007

Thai Wi Rat - Our Favourite Thai Joint

Thai Wi-Rat in the Valley is by many standards our favourite Thai restaurant here in Brisbane. No doubt, it could also easily stand up to any other great Thai restaurant that you'd find in this big country.

The restaurant has been around for a while now, and Bev and I have been there at least 6 times this year alone (talk about a lot, geez). And everytime we go there, the food never fails to impress. We've tried most of the stuff on their menu by now, and feel confident enough to announce to the whole of Brisbane that Thai Wi-Rat absolutely rocks!

Photo Sharing and Video Hosting at Photobucket

Yen Ta Fo noodles- noodles and seafood in a tasty red soup, topped with crispy pork crackling


Unfortunately, and oddly enough, everytime we eat there, we forget to bring our trusty camera along. Perhaps its because we're always too excited about the thought of eating there that we blindly rush out of the house. Well, this last ocassion was different, and we finally arrived at Thai Wi-Rat prepared. Here's some incriminating pictoral evidence of what we pigged out on that day.

Photo Sharing and Video Hosting at Photobucket

Pad Thai with juicy prawns- possibly the most well known Thai noodle dish outside of Thailand


The food boasts regional integrity, something that's increasingly hard to come by these days. The food is of Thai-Laotian influence, and deviates away from most of the run of the mill Thai-restaurant-syndrome dishes (think green, red and yellow curry, fried rice, spring rolls, etc). Although they do offer these dishes still, the focus is on the not-so-stereotypical fare. Our favourite dishes thus far have been the lipsmacking grilled thai pork sausages, stir fried pork leg slices with chilli and green peppercorns, duck larb (mince meat salad), calves liver salad, pork fried with pickled bamboo and pad see ew noodles. They do the usual fare very well too, and we adore the pad thai, som tum (green mango salad) and chicken rice just as much. But ooh, please promise me that you'd order a side serve of deep fried egg and/or fried pork cracklings (just $2 each) to top things off - superduper unhealthy, but just too darn good!

Photo Sharing and Video Hosting at Photobucket

Yum Thai Wi-Rat (Thai Wi-Rat salad)- crispy fish maw, calamari and cashews with herbs and red onion in a sour dressing


To add to the excitement, the restaurant even has a couple of their own no-joke looking metallic "spice kits" which they bring around to every table when it's not too busy. If they don't bring you one of these, you should go hunting around for them; some people like to hog them at their table. Inside them you will find four compartments containing the essentials of Thai eating: chilli powder, fish sauce, sugar, and a sour chilli sauce.

Price-wise, Thai Wi-Rat serves up fantastic food that would'nt break your budget. In fact, it was even featured in the Australian Gourmet Traveller magazine's Cheap Eats column a while back. Apart from the food and the price tags, our other favourite thing about this place is that it opens early and doesn't close till late. That means that you could drop in anytime in the arvo between lunch and dinner and still be served. Now, thats one hell of a joint eh?

Thai Wi-Rat
TC Beirne Building
Shop 48
20 Duncan St
(same stretch as Burlington supermarket)
Fortitude Valley 4006 QLD
Phone: (07) 3257 0884


Technorati tags: , , , , , , , ,

Saturday, June 09, 2007

Custard 2 Ways: Baked Creme Caramel & Frozen Vanilla Custard

Photo Sharing and Video Hosting at Photobucket

As spoken about previously, I promised the good people at the Mount Tamborine Winery cellar door that I'd feature a dessert dish on my blog that (hopefully) does justice to their fantastic Mountain Muscat. Now, I think I've outdone myself! Here is a second dessert, following last week's olive oil and Muscat cake, a duo of of creme caramel and frozen custard, laden with that wonderful Muscat.

I won't deny it, this dish does require a bit of effort. But irregardless of whether you're a self-confessed culinary dummy or an accomplised home cook, this should'nt be in any way out of your league. So here's how its done:

Muscat Creme Caramel and Frozen Custard

Caramel:
150 gm sugar
100 ml water

Custard:
200 ml thick cream
200 ml milk
100 ml Muscat (or other appropriate dessert wine)
seeds of 1 vanilla pod, or alternatively, a few drops of vanilla extract
4 whole extra large eggs (59g min weight)
4 egg yolks
110 gm caster sugar
8 buttered ramekins

200 ml cream (extra)

Preheat the oven to 160C.

For the caramel component of the creme caramels, simply heat the sugar and half of the water over a medium heat till the water evaporates, and the sugar begins to caramelise. Once it reaches a golden brown colour, take off the heat and splash in the remaining water to slow the cooking. Swirl it around till the caramel dilutes and cools down slightly. Distribute warm caramel among the bases of each buttered ramekin.

In a separate saucepan, heat up the cream, milk and vanilla till just scalding (ie. just before boiling point). Meanwhile, whisk the sugar, whole eggs and yolks in a mixing bowl till pale and frothy. Pour in the hot cream mixture bit by bit, whisking constantly to prevent the eggs from scrambling. Then, when all the cream has been incorporated, whisk in the Muscat. Pour the entire mixture back into the pot and heat over a medium-low flame, stirring constantly, for 4-5 minutes till it slightly thickens.

Strain the liquid mixture through a fine sieve into each of the prepared ramekins. If there are little bubbles along the top edges, remove them carefully with a teaspoon (trick of the trade: you could use a blow torch, if you have one, to blast out any small bubbles off the tops of custards). You will have some custard left over, this will be used to make the frozen custard.

Place the ramekins in a baking dish half filled with hot water (aka. bain marie), and cover the entire thing with al-foil. Place in the preheated oven and bake for 35 minutes, or until a skewer inserted comes out clean. Remove, wrap each individual custard with al-foil to prevent drying out, then chill for at least 6 hours, or at best, overnight. Run a hot knife around the rims to unmould them onto a plate, pouring out as much of that sinful caramel sauce as you can! The longer you leave it in the fridge, the more caramel sauce you will get out of it (within reasonable limits of course!).

For the frozen custard, mix the remaining egg custard with the extra cream and churn it in an ice cream maker. If you, like me, do not have an ice cream maker, you can most easily complete this process by placing the mixture into the freezer and diligently mixing with a fork every half an hour till it freezes. That should make it fluffy enough!


Technorati tags: , , , , , , , , , , , , , , , , , , , ,

Save on Washing Up with a One-Pot Chicken and Chorizo Rice Pilaf

Photo Sharing and Video Hosting at Photobucket

Now here's a recipe thats simple to prepare, and best of all, made in one pot. That's gonna save you heaps of time in front of the kitchen sink after dinner; and if anyone asks me, that sounds like a mighty good plan!

A pilaf is a dish where rice (or other grain) is browned in oil, then cooked in a flavoured broth. There are variations of pilafs across the many different cultures of the world. The Spanish have paella, while Indian and Pakistani cultures have biryani. The Italians have risotto, and Africans can be proud to add jambalaya to this list.

Chicken and Chorizo Sausage Rice Pilaf

5 chicken thigh fillets, skin intact, cut into cubes
salt and pepper

1 tsp ground cumin
1 tsp ground fennel
1 tsp ground coriander
1 tsp ground pepper
1 tsp smoked paprika

1 large onion, diced
1 capsicum (green/red), diced
5 cloves garlic, chopped
1 chorizo sausage, diced
3 cups long grain rice

750 ml hot chicken stock, infused with a large pinch of saffron threads
5 medium roma tomatoes, roughly diced
1/2 cup frozen peas

lemon wedges, to serve

Start off by heating a few tbsps of oil in a large, heavy-bottomed pot. When hot, add in chicken pieces, and sprinkle with salt and pepper. Leave chicken to cook on medium to high heat. Resist any temptation to touch or turn the pieces at this point. What you should be looking for is a very well browned and crispy crust to form on the chicken pieces. After 5-10 minutes, turn the chicken pieces, they should have formed a deep brown, crusty exterior, and release themselves from the base of the pot without much coaxing. Season again. Let them cook on the other side in the same fashion. Remove from pot when done and set aside.

In the same pot, add the spices and fry till fragrant, scratching the base of the pot to release the tasty chicken reside thats left behind. Add in onion, capsicum, garlic and chorizo, and cook for a further 5 minutes till the vegetables become translucent. Add in rice and stir to coat the grains evenly with oil. Pour in the stock, saffron threads and the tomatoes. Stir to mix everything evenly. Top with chicken pieces, and sprinkle with peas. Put on a tight-fitting lid, bring to a boil, then lower heat and simmer over the lowest heat setting for 20 minutes. After 20 minutes, turn off heat and let stand covered for a further 15 minutes to steam. Do not at any point in the cooking process open the lid, as this allows precious steam to escape. Remove lid and serve with some lemon wedges alongside.


Technorati tags: , , , , , , , , , , , , , , , , , , ,

Wednesday, June 06, 2007

Olive Oil and Muscat Cake with Roasted Pears and Vanilla Cream

Its been raining for the last couple of days and the weather forecast predicts that this will continue into the week. Thank goodness for this, our dear state certaintly needs every bit of rain it can get.

Photo Sharing and Video Hosting at Photobucket

In liew of this cosy weather, here is a recipe for a stunning cake that can be both healthy and decadent at the same time (minus the cream that is), and really warms you up from the inside out. It was inspired by a recipe in Neil Perry's book "Good Food" that I received as a present from Bev a month back. Neil's recipe is based on a cake batter of olive oil and Sauternes, a wonderfully sweet dessert wine with raisin tones.

In place of Sauternes, I have chosen to use a sensational Muscat from the Mount Tamborine Winery instead, which boasts gutsy flavours of butterscotch and caramel (I think it was $25). I picked up this bottle of goodness on my last trip to Mount Tamborine, on the Gold Coast hinterland. It was there that I also promised the lovely lady at the cellar door that I'd whip up a fancy dessert to do justice to the fantastic wine somewhere in the near future. Mission accomplished.

Neil Perry finished his rendition of this dessert with Sauternes roasted pears and double cream, and I have done so too, substituting Muscat for Sauternes once again, and adding vanilla seeds to the cream for that extra bit of oomph. I urge you to give this one a go too!

Photo Sharing and Video Hosting at Photobucket

Olive Oil and Muscat Cake

115 gms caster sugar
2 large eggs
185 ml extra virgin olive oil
125 ml Muscat (or other similar dessert wine)
80 ml milk
finely grated zest of 2 lemons
185 gms plain flour
2.5 tsp baking powder

Beat sugar and eggs in a bowl till pale and creamy. Add in oil, wine, milk and lemon zest and whisk to combine. Sift flour and baking powder into the wet mixture in the bowl and mix till evenly incorporated. Pour batter into a greased loaf tin (11 x 22 cm) and bake in a 180 degree celcius oven for around 40 minutes till cooked through. Rest the cake in the tin till it cools down significantly. Cut into slices and serve warm with roasted pears, and a sinful dollop of double cream with some vanilla seeds mixed in.

Muscat Roasted Pears

4 buerre bosc pears, quartered lengthwise, cores removed
80 ml Muscat
2 tbsps caster sugar
2 tbsps olive oil

Place pear quarters into a roasting tin/sheet and drizzle with wine, sugar and oil. Toss to coat. Roast in a 180 degree celcius oven for 45 minutes, alongside the cake, turning ocassionally. Pears are done when they are tender and caramelised. Cool to room temperature.


Technorati tags: , , , , , , , , , , , , , , , , , ,

Wednesday, May 30, 2007

The Perfect Laksa- Mastering the Art of 'Tumis'

Photo Sharing and Video Hosting at Photobucket

For those new to laksa, it is a traditional Singaporean and Malaysian dish which is served with permutations of a strict few condiments: boiled prawns, fish cake, tofu puffs, bean sprouts, cockles, and hard boiled chicken, duck or quail eggs. Some vendors like to vary the toppings by adding shredded chicken or crayfish to the mix. Either way, real laksa deviates not much further from this set of toppings. So, now that you have been introduced to the real deal, if you ever see roast duck, pork, beef, scallops or bok choy coming into play, please let it send alarm bells ringing.

For an interesting article that talks about real, authentic laksa, please visit this link.

Making laksa from scratch is simpler than it sounds. All you need to do is learn the art of 'tumis'.

Photo Sharing and Video Hosting at Photobucket

The art of making the perfect laksa, or any other curry for that matter, lies in this one simple process known as 'tumis'. Tumis is a Malay term that refers to the act of frying a spice paste till it is properly caramelised. All too often, I have witnessed fellow colleagues and Aussie TV chefs frying spice pastes for a mere 2 minutes before adding the other ingredients for a particular recipe. Please allow me to insist that cooking a spice paste should take at least 15 minutes, not 2 or 3. Undercooked spice pastes turn out dishes that are bland and horrible.

This techinque of tumis-ing can almost be compared to caramelising onions for French Onion Soup. You need to make sure that the base of the dish is completely and thouroughly caramelised before adding in any other ingredients, or else the dish just wouldn't take off. This, in my opinion, is the trick to cooking many a South East Asian dish.

The picture above shows a laksa spice paste which has just gone into the saucepan. It is mild yellow in colour, homogenous, and emulsified. It needs to be fried with the addition of a little oil in the saucepan till the solids in the paste caramelise. This will take a good 15-20 minutes of continuous stirring over a low heat (just imagine you are cooking risotto, keep stirring and don't walk away till its done).

Photo Sharing and Video Hosting at Photobucket

This next picture (above) illustrates what a properly tumis-ed spice paste should look like. It has now transformed from a pale yellow into a deep red/orange. Notice also that the solids have 'split' away from the oil, and are now frying in their own fat. This is the easiest way to tell when the spice paste is done; the oil seperates from the paste, and the solids begin sizzling in the oil. Now now, there's no harm frying it even longer after this stage; you will just be deepening the colour and intensifying the flavour, which is always a good thing! Thus, I generally continue frying my pastes for a further 5 minutes past this point.

Photo Sharing and Video Hosting at Photobucket

In the above picture, the dot of yellow stuff is a laksa spice paste that is 'raw'. The reddish dot above it is the same paste that has been cooked for 20 minutes over a slow flame, till it has been properly tumis-ed. Now, that should make for a pretty good bowl of laksa!

Laksa paste:
3 lemongrass stalks, lower 2 inches only, sliced
1 cm galangal peeled and sliced
3 candlenuts (or macadamia nuts), chopped
12 dried chillis, reconstitued in warm water
6 shallots, sliced
2 tbsp dried shrimp, reconstitued in warm water
1 tbsp tumeric powder
1 tbsp coriander powder
1 tsp shrimp paste (that smelly stuff from Asian grocers)
water
vegetable oil

Place all ingredients into a blender with a little oil and water to facilitate blending. Blend till smooth. Add more oil and water as necessary to keep the mixture blending.

Tumis as per guidelines above.

2 cups coconut milk
3 cups water
salt
sugar
noodles and condiments to serve
vietnamese mint (laksa leaf), chopped

Once paste is properly tumis-ed, add in water and coconut milk. Return to the boil and simmer for a few minutes. Season to taste with salt and sugar. Ladle over a bowl of noodles and top with condiments such as bean sprouts, hard boiled eggs, cooked shrimp and chicken. Scatter generously with Vietnamese mint, a must-have ingredient in laksa. Do not fret, Vietnamese mint, and all other ingredients listed are available in Coles and Woolworths supermarkets; the exceptions being dried shrimps and shrimp paste, which are easily available at most Asian grocers.


Technorati tags: , , , , , , , , , , ,

Monday, May 28, 2007

Duck Degustation at Isis Brasserie

Isis Brasserie is one of the places in town that I would recommend anyone to go to for some seriously good food. Chef Jason Peppler and his team have, in the past, provided Bev and I with some of our top dining experiences here in Brisbane. For all you food lovers out there, you might like to know that they're running a special degustation menu exclusively for the months of May and June. I have attached the degustation menu here. The menu costs $95 for 9 courses of food, and $155 for food and matching wines.

The feature of this degustation is duck. And my oh my, these people really know how to turn the feature ingredient inside out, manipulating the humble canard into shapes and forms that go beyond our immediate expectations. Lo and behold, duck neck skins, duck eggs, duck livers, duck wings, duck blood, and the entire duck works found their way onto our plates in the most refined and elegant manner.

There was an article in The Age about the dawn of the degustation menu age, and how these dining styles ought to be tools for chefs to showcase their talents and the quality of their ingredients. I completely agree that the chefs at Isis have done precisely that. Even my dining companions agree that they could, I quote: "taste the skill that went into the food".

I apologise for the shoddy photos. I normally have trouble taking photographs at Isis because of the combination of the following 3 factors: 1) I'm still an amateur photographer, 2) their lovely mood lighting makes for a photographer's nightmare, and 3) I just want to dig in as soon as possible, the aroma of duck is way too irresistable to hold off for too long.

Photo Sharing and Video Hosting at Photobucket

Canape: Duck and pork rillettes, sour dough crostini and cornichon


Photo Sharing and Video Hosting at Photobucket

Cappuccino of duck with porcini mushroom powder- my favourite course of the night


Photo Sharing and Video Hosting at Photobucket

Duck neck sausage (in the style of a galantine), with a salad of quince, apple and pistachio


Photo Sharing and Video Hosting at Photobucket

Duck egg pasta, seared Queensland scallop and sauce albuferra- I lapped up every last drop of the gorgeous sauce


Photo Sharing and Video Hosting at Photobucket

Duck liver on brioche, crisp proscuitto and sauce soubise


Photo Sharing and Video Hosting at Photobucket

Civet of duck wing, home-made duck black pudding, peas and smooth potato puree


Photo Sharing and Video Hosting at Photobucket

Sorbet: Lemon and star anise- I personally loved this combination of flavours


Photo Sharing and Video Hosting at Photobucket

Seared duck breast, sweet potato fondant and Amarena cherries


Photo Sharing and Video Hosting at Photobucket

Lemon scented souffle (probably made with duck eggs), white chocolate sorbet


We were highly impressed with most of the dishes on the menu. In our opinion, there were 2 dishes that fell a little under the mark though. We all agreed that the duck liver was slightly overcooked, and the dessert way too sweet. But yet again, in their defence, these are all mistakes to do with the food preparation on the day itself, rather than with the core concept of the dishes. Hopefully, these glitches won't occur when its your turn to dine there!

You need to book the duck degustation menu in advance should you wish to treat yourself to this all out duckfest. I suggest you buzz them real quick as this menu only lasts for a few more weeks!

Isis Brasserie
446 Brunswick Street
Fortitude Valley
Tel: (07) 3852 1155


Technorati tags: , , , , , , , , , , , , , , , , , , ,

Sunday, May 27, 2007

Pastries from Absynthe Bakery, Surfers Paradise

Photo Sharing and Video Hosting at Photobucket

After being at the helm of the Queensland dining scene with his restaurant Absynthe, 2 Michelin Starred chef Meyjitte Boughenout opened Absynthe Bakery on Bastille Day in 2006. Located in the new complex, Circle on Cavill, Absynthe Bakery aims to "bring quality bakery goods to the heart of Gold Coast".

We decide to drop by Absynthe Bakery while in the Gold Coast to see for ourselves if their pastries were as good as they were claimed to be. We arrived a little late in the day, and so the selection had dwindled to the remaining 7 or so varieties of tarts and cakes left in the display. I was initially very tempted to try the vanilla brioche, but decided against it, seeing that it had been left out at room temperature for what I think would have been a good part of the day. Another time perhaps, if I can get there early enough to sample it while its at its peak.

So we ended up ordering 4 types of tarts between us, and we all eagerly joined in the tasting. This is what we sampled: a passionfruit curd and meringue tart, a caramelised pineapple tartet, an apple jelly tartet with caramelised apples, and a raspberry and pistachio tartlet. It was unanimous, we all voted the sour passionfruit tart with the sweet, silky meringue as our favourite of the 4 pastries. The pate sucre (sweet shortcrust pastry) was a perfect balance of crunchy and crumbly, while the passionfruit curd was just as sour as I think sour curds ought to be.

Now I really have to come back soon to munch on that enticing vanilla brioche. I bet its darn good too..

Absynthe Bakery
Circle on Cavill
Surfers Paradise Boulevard
Gold Coast, Queensland
Tel: 07 5504 7114


Technorati tags: , , , , , , ,

Saturday, May 26, 2007

Settlers Cove Celebration of Australian Food and Wine Festival - Noosa

Photo Sharing and Video Hosting at Photobucket

The Grand Marquee


Finally the day had come! We were in Noosa, and the weather was perfect. It was the day we had all been anticipating. The Saturday of the Settlers Cove Celebration of Australian Food and Wine Festival. And what a mouthful that was, in both senses of the word.

It truly was a day to remember, and although we did not participate in any degustation dinners or guest chef cooking masterclasses (we did not have the budget for it), we were fortunate enough to have been able to participate in the culinary exhibition and food and wine tastings in the Grand Marquee at Lions Park.

Our day began with cooking demonstrations by celebrated chefs from all over Australia. Chefs Giovanni Pilu and Matt Moran were the two that I was particularly keen on seeing. And so it was. Chef Pilu teamed up with Chef Phil Scott, Head Chef of Pilu in Noosa, to prepare classic Italian dishes such as grilled sardines and tomatoes on bread, and pasta Amatriciana. Matt Moran was scheduled to present together with Fifteen Melbourne chef, Tobie Puttock, but ended up doing a solo while Tobie couldn't be present. He cooked up some fried calamari and a tuna nicoise salad, both recipes from his book. What better a way to gain publicity than that! We were all impressed by the tips and tricks he shared throughout the session, like his 2 minute 20 second quail egg technique for perfectly soft yolks.

Photo Sharing and Video Hosting at Photobucket

chefs Phil Scott and Giovanni Pilu preparing classic Italian fare


Photo Sharing and Video Hosting at Photobucket

pasta Amatriciana


Photo Sharing and Video Hosting at Photobucket

chef Matt Moran of Aria, Sydney


Photo Sharing and Video Hosting at Photobucket

seared tuna Nicoise


We then adjourned to the exhibition areas where we exchanged food coupons for plates of food prepared by chefs of local Noosa restaurants. Wonderful smells permeated the entire venue, and took us in all directions, going wherever the aromas seemed to originate from. We found ourselves indulging in orange crusted prawns with goats cheese and fresh peas, flash grilled Mooloolaba baby calamari drizzled with chilli oil and lemon aioli, and rotolos filled with Gympie Farm goats curd, rocket and mushrooms, topped with a decadent sage butter sauce.

Photo Sharing and Video Hosting at Photobucket

at the food stalls


Photo Sharing and Video Hosting at Photobucket

orange crusted prawns with goats cheese, fresh peas and mint


Photo Sharing and Video Hosting at Photobucket

squeezing lemon aioli on grilled baby calamari


Photo Sharing and Video Hosting at Photobucket

flash grilled baby calamari from Mooloolaba, sweet and succulent- one of the best I've tasted


Photo Sharing and Video Hosting at Photobucket

pasta rotolo filled with mushrooms, rocket and goats curd, drizzled with sage butter


It was a fantastic day, and we even had time to head to the beach after the festival had wrapped up. This is the kind of day that I live for, and I'm certainly looking forward to next year's festival.


Technorati tags: , , , , , , , , , , , , , ,

Monday, May 14, 2007

Roast Pork Belly with Crushed Anchovy Sauce and Cos Lettuce Hearts

This is the second pork dish in a row that Bev and I are posting on our blog. We can't help it. The quality of pork in this country is nothing short of fantastic, and so we are blessed. I'd expect that in a few days time you'd see yet another pork dish featured here in our blog: pork trotters braised in milk and sage, pulled apart and tossed through some fresh egg pasta. But let's leave that till then. For today's dinner, we cooked up a roasted pork dish using a slab of pork belly purchased from Burlington Butcher in Chinatown Mall, Fortitude Valley.

Pork belly is one of the cheaper cuts of meat that you can purchase. We got ours at around $9 a kilo, and a kilo of that makes up a pretty big slab! Because it has quite a fair amount of intra-muscular connective tissue, pork belly needs to be cooked gently and slowly to make it tender and delectable. Braising, slow roasting and simmering all work wonders for this cut of meat.

Photo Sharing and Video Hosting at Photobucket

Below is the recipe for the roast pork dish that we made tonight. You may think that pork and anchovies are an odd match, but allow me to assure you that it's not quite as horrible it may sound to some! In fact, the saltiness of the anchovies and the acidity of the lemon in the sauce work well to offset the greasiness and meatiness of the pork belly, rounding out the overall dish quite nicely.

Crispy Roasted Pork Belly

1 kg slab of pork belly, from your local butcher
1 tbsp coarse salt
1 tbsp chopped rosemary
1 tbsp whole fennel seeds

Score the skin of the pork belly at close, regular intervals. Make sure that the incisions run deep enough to cut through the first layer of fat. This helps the fat to render out during the cooking process, and makes the skin crispen up nicely. Mix the salt with the rosemary and fennel seeds. Rub this dry mixure into the skin and grooves of the pork. Roast in a 250 degree celcius oven for 15 minutes till skin begins to dry slightly.

Turn down the temperature of the oven to 150 degrees celcius, a temperature great for slow roasting, and roast for another 3.5 hours. Place a tray of water underneath the pork to keep the oven humid all the time. As the water evaporates, keep topping it up. This helps to prevent the meat surface from drying out too much.

After 3.5 hours, take the meat out of the oven to rest. Depending on your oven, the crackling of the pork may or may not be puffed and crispy at this point. If yours, like mine tonight, is not crispy and puffed yet, transfer it to a higher shelf in your oven and cook it at 220 degrees celcius for a further 5-10 minutes till the skin puffs up. This step is crucial in ensuring that you have a crackling that is crispy rather than 'gummy'.

Rest for 15 minutes under a loose covering of aluminium foil. Carve and serve with anchovy sauce and salad leaves. I used cos lettuce hearts, which are essentially the inner most leaves of the cos (a.k.a. romaine) lettuce. These inner leaves are more crunchy and sweet than the outer ones.

Anchovy Sauce

5 anchovy fillets from a can/jar
1 tsp chopped herb (basil/rosemary/thyme/chive)
1/4 clove garlic
juice of half a lemon
100 ml extra virgin olive oil
freshly ground black pepper

Come to think of it, this is technically more a vinaigrette than a sauce. Either way, bash the anchovy fillets, herbs and garlic in a mortar and pestle till a rough paste is acheived. Alternatively, chop them very finely with a knife. Add them to a bowl and mix in the lemon juice. Incorporate the oil in a steady stream with a fork or a small whisk. Season plainly with pepper. Anchovies are pretty salty as is, so you may not need any extra salt for this sauce/vinaigrette. It goes great with fish, white meats and obviously, salad leaves.


Technorati tags: , , , , , , , , , , , ,

Teriyaki Glazed Pork Cutlets

Photo Sharing and Video Hosting at Photobucket

Teriyaki sauce is much easier to make than most would think. I do agree, it may come across as rather silly to trouble yourself in making a sauce so easily available in supermarket aisles. "It's as ridiculous as making your own ketchup!", a friend of mine once exclaimed.

Nonetheless, I'd like to tell all my dear readers that it's dead simple; it calls for only 4 ingredients (sake, mirin, soy, sugar), and takes at most 30 seconds to make! Some might be put off at the thought of finding sake and mirin althogether, but truth be known, sake can actually be found at your local bottle shop, and mirin at any supermarket. Eureka!

Teriyaki sauce goes with anything.. absolutely anything: steaks, chops, fish, prawns, vegs.. Take a minute to make up a little batch of this and it will keep in the fridge for weeks. Whip it out at any time to season grilled meats or spruce up stir fries. See, cooking IS easy when you have versatile sauces like this on hand!

Photo Sharing and Video Hosting at Photobucket

Teriyaki Sauce

Basic ratio:
3 tbsps sugar
5 tbsps mirin
5 tbsps sake
100 ml Japanese soy sauce

Measure and mix all ingredients in a bowl. Simple as!

You may increase the yield of the recipe by simply multiplying the ingredients, following the same ratio.

Teriyaki Glazed Pork Cutlets

4 pork loin/leg cutlets
2 tbsp oil
1 quantity teriyaki sauce (recipe above)
Toasted sesame seeds and seaweed sheets to garnish (optional)

Grill pork cutlets in a hot pan with the oil on both sides till half cooked. Add in teriyaki sauce and let simmer until it thickens enough to coat and glaze the chops. Garnish with sesame seeds and shredded seaweed sheets. Apply this same technique to other proteins such as beef, chicken and fish.

Tip: If cutlets are cooked before the sauce has reduced to a honey-like consistency, remove them to a seperate plate first. Continue to simmer the sauce until it thickens and becomes sticky. Return cutlets to the pan and smear with the sticky sauce. Please do not be tempted to leave the already-cooked pork in the sauce just because it seems "troublesome" to take it out and put it back in again later. Overcooked pork is mighty tough and horrible!


Technorati tags: , , , , , , , , , , ,

Chicken Noodle Soup- an Ode to Mom

Photo Sharing and Video Hosting at Photobucket

This here is a different little take on the old chicken noodle soup that we are all so familiar with. This dish goes beyond the boundaries of being just an ordinary food. It can actually mean quite a lot to many people, evoking memories of childhood, rainy days and those times when the flu bug struck, and Mom saved the day with a steaming bowl of chicken soup.

Well, today being Mother's Day, I decided to cook this as an ode to my mother, for all those times in my childhood that she nourished me with these kinds of wholesome foods (Ok, there were some yucky foods that she forced upon me too, but for today's sake, I'll chose to forget those).

Chicken Noodle Soup

6 chicken wings, cut into sections
1 brown onion, diced
1 leek, sliced
2 stalks celery, diced
1 large carrot, diced
1 clove garlic, chopped
2 bay leaves
2 sprigs of thyme
2 cups of small pasta shapes or spaghetti broken into short lengths
1 litre of chicken stock, or water mixed with instant stock powder
parmesan cheese
extra virgin olive oil

Heat enough oil to coat the base of a large saucepan. Add in chicken pieces and allow to brown on all sides, for approximately 5 minutes. Remove them from the pan and set aside. In the same saucepan, throw in all vegetables and let them sweat for a good 15 minutes till they are soft and fragrant, stirring well to dislodge all the yummy chicken residue from the bottom of the pan. Return chicken pieces to the saucepan followed by the stock, bay leaves and whole thyme sprigs. Simmer for 10 minutes, skimming once or twice to remove any excess oil floating at the top.

Add in pasta to the soup. Allow it just enough time to cook (according to the specified cooking time of the particular pasta you are using). Season well with salt and black pepper. Ladle into bowls, drizzle over with some olive oil and grate over parmesan cheese if desired.


Technorati tags: , , , , , , , , , , ,

Tuesday, May 08, 2007

Home-Cured Kingfish 'Bacon'

Photo Sharing and Video Hosting at Photobucket

Most of us know pancetta, the famous Italian version of bacon, which is essentially pork belly that has been salted and spiced, and left to dry for around 3 months. But which of us would have thought of making pancetta with fish?

Well, thanks to the the ingenuity of Melbourne chef, Matt McConnell, the brains behind Bar Lourinha, I've had the joy of making this myself. The recipe for this dish appeared in the September 2006 issue of the Australian Gourmet Traveller, and I've been wanting to make it for the longest time, except that I couldn't find any decent kingfish around Brisbane. Or maybe I just wasn't looking in the right places.

Anyway, John West, the household name known best for tinned salmon, has recently released a range of packaged fresh seafood for Coles supermarket shelves. Within the range I found yellowtail kingfish, one of those wonderful foods that I've been hunting down for ages. In a snap, I bought a pack, and raced straight home to finally make this dish that I've been dreaming about for months.

Photo Sharing and Video Hosting at Photobucket

Kingfish Pancetta

400 gm piece of yellowtail kingfish, skinned and boned

'Pancetta' spice mix:
165 gm sea salt
3/4 tsp sweet paprika
1/4 tsp each of ground allspice, ground cloves and ground cinnamon
1 tsp finely chopped thyme
1 tsp ground black pepper
1 tsp sugar


Mix all ingredients for spice mix in a large bowl. Roll fish in spice mix and wrap in plastic wrap. Refrigerate for 4 hours, then unwrap and pat dry with absorbent paper. Wrap fish in muslin cloth (you can use kitchen towels or paper towels) and continue to refrigerate overnight or for up to 4 days. The flavour will develop and intensify over time.

Before I sliced my fish, I rinsed it with water to remove the excess salt. This was not specified in the original recipe, but I found it too salty initially when I didn't rinse it first. Using a sharp knife, slice kingfish very thinly on an angle. Arrange slices on a plate and drizzle with extra virgin olive oil and lemon juice. Scatter with any kinds of herbs or greens as you wish. Here, I have used thyme and sliced red onion, which works very well with the saltiness of the fish.

If you can't get you hands on kingfish, I reckon salmon would be a decent alternative. Just make sure its really fresh, and not looking like those sad one that seem to have been stepped on (quite a common scene at supermarket seafood counters).

Photo Sharing and Video Hosting at Photobucket

This dish makes entertaining a breeze- just slice up the fish in advance, lay it on a large platter, and scatter over the greens. When your guests arrive, simply drizzle over the olive oil and fresh lemon juice. Crack some pepper over the top and pass around with toothpicks. Everyone will be grinning, I guarantee you that!

Technorati tags: , , , , , , , , , , , , , ,

Friday, May 04, 2007

Pasta with rocket pesto and ricotta fritta

Photo Sharing and Video Hosting at Photobucket

A pesto is a fabulous sauce to have on hand at any time. It can be tossed through pasta, potatoes, salads, mixed into a cream sauce for meat and seafood, or literally drizzled over anything at all. Making pesto is so simple, and the ingredients required are few. Just be sure to follow the general guidelines below. Once you have tasted your own fresh pesto, you'd never go back to buying it off the shelves.

PESTO 101

- Use a good handful of greens per batch of pesto. Basil, rocket, coriander and parsley are all widely used to make pesto, basil being the most traditional.

- Use a handful of freshly grated parmesan-type cheese (parmigianno reggiano, pecorino, grana padano, romano, etc). Never be tempted to use those longlife shelf versions, they just don't match up. Someone once compared their aroma to baby vommit.. I second that.

- Use half a clove of raw garlic (not half an entire head!). Just a little raw garlic goes a pretty long way.

- Throw in a couple of teaspoons of toasted pinenuts, macadamia nuts, almonds or hazlenuts. Pinenuts are the most commonly used. Add more if you prefer a chunkier pesto.

- Add one cup of good extra virgin olive oil. Make sure it is extra virgin, because you want that fruity flavour. Add more later, if necessary, to thin down the pesto.

- Whiz everything together in a blender, or you can opt for the more traditional method, via mortar and pestle. Do not overblend as the excess heat generated by the blades can 'kill' the wonderful aromas of the herbs. Season liberally with salt and black pepper.

-I like to add a little lemon juice to balance the oiliness of pesto. This citric acidity also adds a touch of 'zinginess'.

For dinner, I made up a batch of rocket pesto and tossed it through some hot pasta. Then I topped it off with some ricotta fritters that I picked up from Jamie Oliver's book, Jamie's Italy. For this recipe you need to use fresh, crumbly ricotta from the counter section of the supermart, or a deli. Creamy ricotta from plastic tubs will not work here.

Jamie Oliver's Ricotta Fritti

455 gm crumbly ricotta cheese
2 tbsp finely grated parmesan cheese
1.5 tbsp flour
1 large egg
salt and pepper

Mix ingredients in a bowl. Season well. Cook spoonfuls of batter in a hot, oiled pan on both sides till crispy, but moist on the inside. Eat immediately.


Technorati tags: , , , , , , , , , , , , , ,